
Illustrator Guest Post
December 2016
What a joy to introduce Megan as our guest blogger for this post! I hope all of you aspiring authors and artist get to work with someone as talented and gracious as she is. Thanks, Megan.

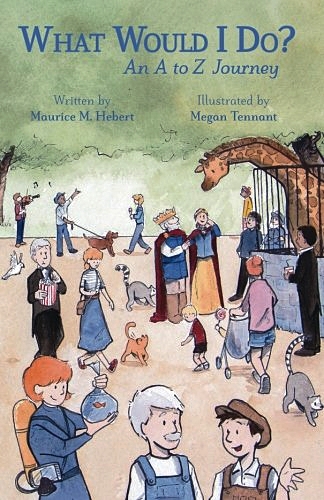
Hello! I’m Megan Tennant, illustrator of “What Would I Do?” and I am popping in to share what my role was like in collaborating with Moe on this children’s book.
What I have to say is by no means the textbook operation of how books get published; but I hope that through this journey, you are inspired and informed to go write/illustrate your own story!
Early Stages – Book proposal, Contract (March – April)
When I decided to leave my full-time job to pursue a freelance career in illustration, Moe approached me about collaborating on his book. I immediately said yes because when you are a starving artist you accept every offer. But in all seriousness, I knew Moe and knew his work would be just wonderful. And I was right! I was charmed with his whimsical and funny manuscript.
The initial step was not at the drawing board, but at the bookkeeping desk: I created a contract between Moe and me that clarified the dates for deadlines on rough drafts, revised sketches, and final art, how much I was to be paid, royalties, and other helpful items. This is a really important step. It’s vital to make sure you have good and clear communication about things (like money and deadlines) at the beginning so both you and the author are on the same page and have the same expectations. This is also to protect both of you from getting in a sticky situation should either one of you fail to deliver – e.g., if Moe paid me but I failed to deliver final art. If you aren’t sure how to begin drawing up a contract, there are some helpful templates online like this one: http://www.illustrationcastle.com/blogimages/Contract_Template.pdf
Once we both agreed and signed the contract, I marked on my calendar the dates for the various deadlines. I can’t emphasize enough how important it is to be timely and punctual with delivering the work when you say you will. That reflects a great deal on the kind of artist you are to work with and level of professionalism.
Drawings – Rough drafts, Revised sketches, Final art (April – October)
Once the bookkeeping was done, I sat down with a cup of coffee and read the manuscript. My first reading was kept casual so that I didn’t overthink it….trying instead to just let whatever came to my imagination. Then I re-read the manuscript with a sketchbook handy to catch any thoughts and ideas. Some illustrations came immediately in my mind’s eye when I read them and some were long and agonizing labors of love. I’ll leave it up to you to guess which ones were which!
From there, I sketched rough drafts: loose pencil drawings to show my ideas for each illustration. I marked the size of the page, where the text would be placed, and the gutter (where the two pages come together). Then I scanned each drawing and emailed them to Moe for thoughts/approval.
Probably my best advice during this stage is not to get discouraged if there are lots of edits and revisions at this stage. It’s not supposed to be polished yet and you want this stage to be the one when you really iron out all the problems. Having the author be another set of eyes is extremely helpful. I also consulted with a local illustrator friend. She was very helpful to see things with an artistic eye and offer ideas to make things visually more engaging. When I compare some of my rough drafts to the final art, it’s amazing how much better they became because of other people’s input.
Two weeks after the rough drafts were discussed, I sent revised drafts and repeated the process.
Then the best part came! The final art! Using the approved revised sketches as my guide, I inked and painted the final paintings that would be in the book. It’s also critical at this step to know exactly your printer’s specific requirements for bleeds: this just means that your illustration extends a little extra on all borders with non-essential images so that you have a clean crop (without the risk of white showing). Most printers are fine if you have a 0.125 inch bleed all the way around.
There are as many styles of illustrating as there are artists, but my process for this book was to start with a pencil underdrawing on Arches 140 lb. cold-pressed watercolor paper, then do the inking with technical Prismacolor pens. Once that was done, I applied the watercolor. Some of the illustrations also lent themselves very nicely to doing some airbrush work with gouache (an opaque watercolor) to add effects like smoke or dust clouds.
Doing the 27 illustrations plus the cover took about a month.
Submission to Printer – CreateSpace and Imaging (November)
Familiarize yourself with all the printing specifics for your self-publisher. Since we self-published with CreateSpace, I made sure to write down every detail: measurements for bleeds, trim areas, PDF file size, etc. This is important to do before you start layout of your final art.
Once the final art was painted, there was still lots to do. I was responsible for turning the final art into a PDF file for uploading to CreateSpace. This required getting my illustrations “digitized” or “imaged” so that they would be high-quality, high-resolution files able to be sent to the printer. This was done by a frame shop who had the equipment to do this – I was not able to do it myself. Once they had the JPGs for me, I uploaded them into InDesign, added the text necessary and saved them as “Press Quality” PDFs. This InDesign file included the Cover, Dedication Page, Title Page, Interior Pages, and Author/Illustrator Profiles. If you are unfamiliar with this software, you could hire a graphic designer to do this for you.
Once you upload and approve your files for print, you will receive a hard copy proof in the mail. Holding the book in your hands is very exciting and it gives you the ability to final check that all the images, text, and spacing looks good. If not, you can make the adjustments and resubmit the files.
And that’s about it! I hope this was in some way helpful to see “behind the curtain” of illustrating a self-published children’s book.
Megan

